
Every linemen must have a great start and stance if they want to be successful. And as coaches, we must have a solid teaching progression to achieve that goal. If you wish your defensive linemen to have success either rushing the passer or stuffing the run, they’ll have to have a solid start and stance.
In this article, you will learn how to do exactly that through these five defensive line stance and start drills.
Part 1: Building Explosion
In the past, I have begun with putting my defensive linemen into a right or left handed stance and holding the position for me to correct before moving on to the first steps with a punch.
What I do now is work the actual hand punch/placement and hip explosion first before moving on to the stance. That way, when they are ready to work getting into a good three point stance, they have the other skills ready to use with their first initial steps and punch out of their stance.
I use these two drills for both my 7th grade linemen as well as my varsity line when we are in the spring and summer practice sessions or need work on the initial punch and hip explosion that are very important when coming out of their stances.
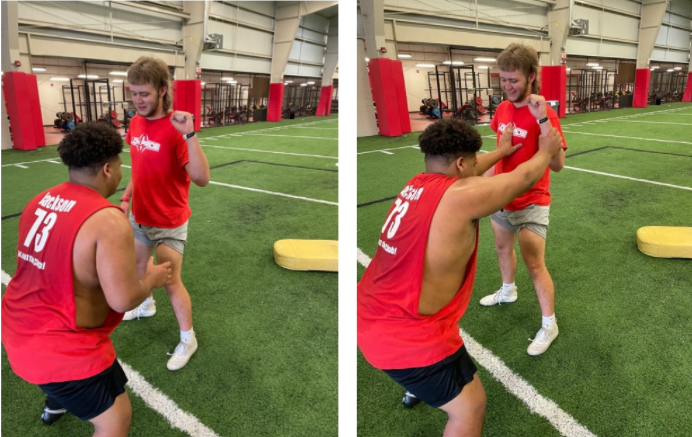
Drill 1: Punch From a 2-Point Stance
Drill Set-Up
This can be done with pads, in cloth with hitting dummies, or with a sled.
- Pair up players in groups of two.
- One player will be holding a hitting dummy or will stand with his hands at his sides if he is in pads.
- The other player on defense will be in an athletic position with his hands ready to strike.
- If you are working this drill with head up techniques (0,2,4,6), players will need to mirror each other.
- If you are working this drill with shaded techniques (shade, 3, 5, 9), players will need to shade their partner either to the left or to the right.
Drill Progression
- On the coach’s command, the defensive lineman will punch the lineman across from them in either the chest plate if they are working head up positions or on the v of neck and the bicep (the player getting punched can hold their outside forearm up if you are doing the drill without pads as indicated in the diagram below).
- They will need to hold the position until the coach tells them to reset for the next rep.
Coaching Points
- Physical punch
- Thumbs up
- Full extension of the arms
- Athletic stance. Not standing straight up.
Examples:
Head Up Techniques:

Shaded Techniques:
Drill 2: 6-Point Explosion
Drill Set Up
This stance and start drill can be done in pads, in cloth versus a dummy bag, or against a sled or surface that allows you to punch.
- Put players into groups of two.
- One will hold a bag while the other is in a six point stance with their hands, knees, and feet on the ground (diagram below) facing the player holding the bag.
- You can shade players if you work your defensive linemen from shaded techniques.
Drill Progression
- On the coach’s command or whistle the defensive lineman will shoot his hips and hands at the player in front of him. He will need to fully extend his hands and hips.
- The player will need to hold the position until the coach calls for a reset.
Coaching Points
- Physical hips and hands.
- Full hip extension (players can tend to keep their hips back).
- Full arm extension.
- Hand placement.
Part 2: Building the Stance
I coach seventh grade football as well as varsity at the school I am currently coaching at and this is one of the most difficult drills for players, both young and old, to master in terms of having a great stance.
I use three basic drills to get my players working from a three point stance.
- Three point stance holds (right/left handed stance).
- One step punch
- Two step punch
By the time I do these three drills, I have already worked basic punching/hand placement technique from a two point stance (athletic position) as well as shooting hands and hips from a six point stance.
Drill 3: Three Point Stance Holds (Right/Left)
Drill Set Up
Have the defensive linemen get into lines of four, spread out to where they are comfortable and can get into a stance. I usually put them five yards apart (diagram below).


Drill Progression (right handed stance)
- Have players stand with their feet shoulder width apart.
- Players will move their right foot back to where their toes are level with their left instep or heel (this can vary with taller players).
- Have them squat down and bring their elbows to their thighs. From there they will need to put their right hand on the ground.
- Make sure that your defensive linemen have a good amount of weight on their hand and their butt needs to be up. They can test it by picking up their right hand. They should fall forward with the correct amount of weight down.
- Their head needs to be up and able to look straight or inside at a ball.
- Have players hold their stance while you walk by and check for proper stances. This will take time for them to get it down.
You will do the same progression for the left handed stance as well except the left hand will be on the ground and the left foot will be back.
I like to have them put their arm that is not on the ground up and ready to strike when getting out of their stance.
Drill 4: One Step Punch (R/L handed stance or either)
Drill Set Up
This can be done in cloth with a dummy pad, in pads, or against a sled.
- If it is against other players, have a group holding bags or lined up to be punched in front of each line, facing the defensive linemen.
- Have the defensive line get into lines of four with a ball/ball on a stick/coach’s foot that will be snapped.

Drill Progression
- On the snap of the ball, the defensive lineman will take one six inch step and will shoot their hands at the opposing lineman (hand placement will vary based on how the d-line is shaded).
- The coach will have them hold their position so that he can make sure they can make sure that everyone is using proper technique. He will reset them.
Coaching Points
- Good stance
- Physical punch
- Good six inch step. Overstepping is common.
- Eyes on the blocker.
Drill 5: Two Step Punch
Drill Set Up
This can be done in cloth with a dummy pad, in pads, or against a sled.
- If it is against other players, have a group holding bags or lined up to be punched in front of each line, facing the defensive linemen.
- Have the defensive line get into lines of four with a ball/ball on a stick/coach’s foot that will be snapped.

Drill Progression
- On the snap of the ball, the defensive lineman will take a six inch step while shooting his hands and hips at the opposing lineman (hand placement will vary based on how the d-line is shaded).
- The coach will have them hold that finished position until he has looked to make sure that all players are in the correct position.
Note: After a few reps you can skip the part where your players hold their position and have them reset for the next rep. Make sure to check them to see if they are watching the ball.
Coaching points
- Good stance
- Low get off
- Physical punch
- Disciplined eyes (ball movement)
Conclusion
These five stance and start drills for your defensive linemen will help you set up your players to be successful coming out of their three point stances.
You can run these drills before or after you teach your defensive linemen how to get into a three point stance.
I prefer to do it before because it is much more enjoyable for my players to get to do something active instead of static when we begin practice as well as preparing them to take their first two steps and punch off the snap of the ball with good hips and hand placement.
This article was originally published in two parts in Headsets: Volume 1, Issues 7 & 8.


